Tuesday, July 30, 2013

And the winner is...

Thank you all for the wonderful feedback on the Stencil Girl Blog Hop ~~ I loved seeing ALL the different ways to create from the same stencil! I feel very lucky to work with such a creative team at StencilGirl.

Remember you can come back to the post and watch them again at any time. Bookmark them as "favorites" for when you need some creative inspiration.

I know I will!

And as promised I drew a name for the winner of Mary Beth Shaw's wonderful book Flavor for Mixed Media, a $25 value.


And the winner is:


Thanks for such a thorough tutorial - love those stars! Wish they looked like that in my sky. :-) Please enter me in stencil giveaway, would love to try some of your techniques.
ReplyDelete


Email me at:  kirstenreed@yahoo.com with your mailing informaiton and I will send it out tomorrow!


Friday, July 26, 2013

Blog Hop with Crossed Rounds & Squares & a Giveaway!!

Hello and welcome to a fun tutorial on using layers of paints and primarily one stencil to create a rich looking, layered canvas!  In this lesson, I will be using Andrew Borloz Crossed Rounds & Squares Stencil L159 as my main stencil with different colors of paint to create a magical scene of wonder and whimsy. The process is a little long but worth it and if you don't have a ton of stencils at your disposal, this is a good method to learn to get your creative on!

(1) I took a 16x20 canvas and glued down handmade tissue paper I had previously created that was in my stash.  This part is just to give you some texture and interest in your background.


(2) I sketch out some ideas on my very teeny tiny sketch book.  I decide on a girl reaching up for the stars.


 (3) I add some creative paint swirls and strokes to the top of my canvas.  I am primarily working with warm colors to start.


(4) I spray and allow dripping and allow the warm colors to meet one another and make interesting marks of their own.


 (5) I pull out Andrew's stencil and still using my warm color palette, I randomly dab through different shapes all over the side of the canvas.


(6) After my warm colors have made their mark and are mostly dry, I start doing the same with a cool color palette of greens and blues.


This is what I have when I am done.  What do you think?  I am loving all the layers and just think, we have only used ONE stencil!


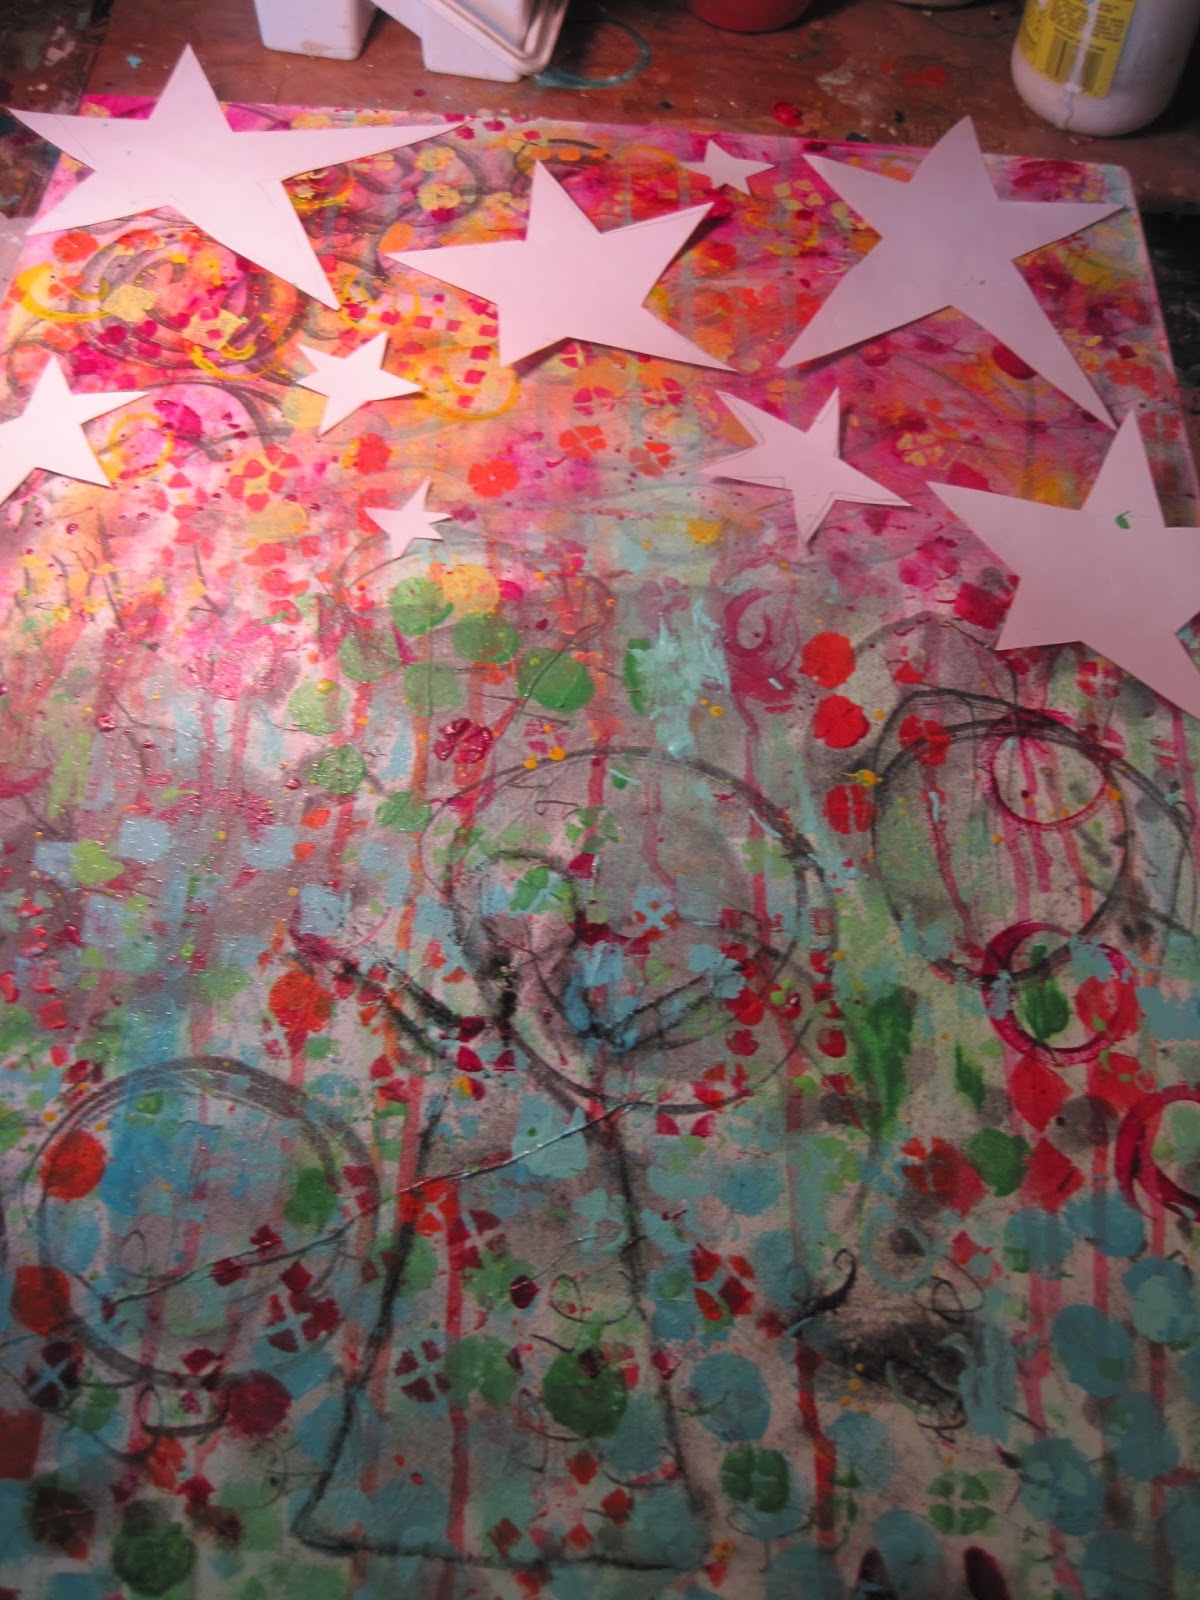
(7) I think hand cut out stars from scrap paper and sketch my "vision" on to the canvas with a Stabilo pencil. I play with the layout until I am pleased.


 (8) I then decide to create some "grass" for the girl and begin to blot out some of the busy background with paint.  I paint in my sketched out grass area and then lay the Rafters Stencil by Marth Beth Shaw over my paint, and rub off the paint in the stencil areas.  Some people call this reverse stenciling. It is a fun technique and gives you a different look.  Be sure to use a damp (not wet) towel or a baby wipe to rub off the paint.  You will need to work quickly for this step as acrylics dry fast.


See how you can see parts of the background peeking through but there is still a predominant green grass area?


(9) I trace my stars with the Stabilo pencil and then outline again with a white wash.  I mostly do this because I can "see" the scene better this way.


 (10) I then add in some teal and blue paints to "fill in" the sky.  I use the same reverse stenciling technique as in step 8 with Andrew's stencil again scraping paint off through the circles.


It is beginning to come together.


 (11) Now I start adding details and dimension with my Faber Castell pens.  I also go over the grass area again with Andrew's stencil only in a darker green.  I don't want my painting to look too flat. I want it to have some depth.


(12) I use Andrew's stencil to add some interest to my girl's dress.  I give her dress a checkered look with some blue paint through the squares.


(12) I add some more texture to the sky with a darker blue around the stars and through the small square part of Andrew's stencil.  I added some white in to the grass.


(13) I mix some Titanium white with teal and blend my sky, covering up some of my circles, leaving others more obvious.


(14) I then add details with my pen.


Don't you just love how the stars pop out of the sky with all that warm color and texture!?!


There you have a completed canvas ( I will be adding a quote to mine) using two stencils, but primarily one.  Have fun creating and check back with me ~ I'd love to see you stuff!

Before you go, leave a comment and sign up for my blog via email if you aren't already and you will be entered to win Mary Beth Shaw's book ~ Flavor for Mixed Media.  I will draw a winner July 30th ~ so make sure you enter before midnight July 29th.


Also be sure to check out other fun ways to use Andrew Borloz's stencil 
with the rest of the StencilGirl team!

Blog Hoppers


Kirsten Reed ...you are here now
Leslie Jenison....next stop

Saturday, July 20, 2013

Soak It In

It's been a busy couple weeks with two sets of company visiting, a soccer tournament for two weeks and a show! I am playing catch up but seriously thinking that might never happen.

Sigh.

Then I reflect on the things that really matter. Friends, family and time we have with them.

Although our lives have been moving a mock speed this summer, the past two weeks we have had the pleasure of spending time with family we don't often get to see. And it was good just to slow down a bit and soak it in.

First, my cousin and my uncle came up for a quick visit.  My uncle will be 83 next month. He is strong, kind and loving uncle. I enjoyed just sitting with them and soaking them in.  Talking, drinking coffee and cooking.  It was great.


Then my father-in-law came to visit.  What a blessing his visit was. As many of you know he was knocking on death's door last fall in the hospital and his only hope was a new heart.  He received a transplant the day after Thanksgiving and has been recovering since.  This was the first time we got to see him, love on him and spend time with him. It truly is a miracle that he is alive.  He celebrated his 73rd birthday with us and got very emotional realizing how very close he was to not making it to this birthday.


So even though, I have huge piles of laundry, a dirty house, weeds in my garden and a things to do list a mile and a half long, I am thankful for this precious gift of time with family.

Go soak in your day!


Wednesday, July 17, 2013

Cross Art Tutorial


One of my favorite verses from the Old Testament is Numbers 6:24-26 which says "May the Lord bless and keep you; May His face shine upon you and be gracious to you, May the Lord turn toward you and grant you peace."

There are many different translations and the words are somewhat different, but the meaning is the same.  It was a verse I said over and over to my babies when they were little and I snuggled next to them or rocked them. I just find comfort in it.

So when I came across Jessica Sporn's Hebrew Calligraphy stencil from StencilGirl and I knew I could incorporate it into art ~ I was thrilled! The crazy thing is right after I purchased the stencil, I went to an art retreat and got to meet Jessica and have lunch with her. She is lovely and does amazing art too! If you don't already follow her blog check her out here.

I wanted to incorporate the stencil into a piece of art that was meaningful to me. So this is what I did:

(1) First I took an old, ugly canvas I started one day when I apparently couldn't get my "art" on.  I decided I would transform it.


(2) Then I painted a palette of cool tone colors and added texture with dabs of molding paste.


(3) Then I took molding paste and the Jessica Sporn Hebrew stencil and scraped it through with a palette knife.


(4) I then let it dry overnight.  Once it was dry I erased the pencil lines.


(5) For this cross I painted it with Titanium White and added details and blending where needed with Faber Castell markers.


Here is another cross I did with the same basic steps but a different color palette.


Have a blessed day!

Monday, July 15, 2013

A Token of Love

Phew! I am whipped...this past weekend was a lovely but very busy show at the Swanky Plank Marketplace at Rippavilla Plantation. It was the first year they did the show and overall I think it was a success. I sold my giraffe ~ he was a popular guy ~ could have sold him ten times.

While I was there, I had the chance to meet some other great vendors including Kim Hanauer who creates the most amazing, beautiful and unique jewelry from vintage finds.  She has pickers all over the world search high and low for unusual rare vintage finds...Kim then turns on her creative mind and transforms them into gorgeous, one-of-a-kind statement pieces.  She has a impressive collection of lockets, medals, coins and charms that are over 100 years old. Each with it's own history, each one rare.

One of the necklaces she had was a Victorian love token with the initials ESA (I think).  The love token is a coin that has been smoothed one side or both and then hand engraved.  These coins were made as keepsakes from the giver to the recipient and most commonly included the giver's initial on one side of the coin.  For more on the history of love tokens click here.


I was in love ~ what an interesting piece.  Kim then crafted stones and sterling down the chain to make it a piece any girl would be proud to wear.  I immediately fell in love. She told me as a precaution, I should buy it before someone else picked it out, but I didn't. It was the beginning of the show and well, I hadn't made any money yet. I thought better to wait.

Well, the lady standing next to me ended up purchasing MY NECKLACE! sniff sniff.  I could have kicked myself for not buying it.

The next day at the show, Kim brought me one of her special tokens she had been holding on to for "just the right person" and she thought of me! :)  It was another Victorian love token, silver like the first, a bit smaller, with the initials A.R.T. ~ hello??!!! Oh my!! I was thinking ~ wow ~ this one is SO much better because it spells out art and I am an artist! How flipping cool???


Needless to say I wore it and let my husband know it was an early birthday gift..hee hee!  So if you are ever in the market for an unusual piece of jewelry, Kim is your gal.  Check out her Facebook Page and visit her at the shows she attends, you too will fall in love!